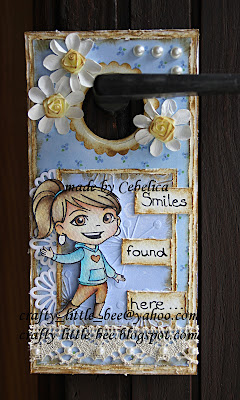
Good morning! First of all a big thank you to all of you who haven't given up on me even though I'm not visiting your blogs as much as I'd love to at the moment. But I hope this will change soon. The apartment is nearly finished and unless something goes terribly wrong (fingers crossed it won't) I'm moving this weekend! Yes, only a few days left. I'm really excited about it and cant wait!! :D And once I'm settled in at my new place I will visit your blogs more regularly again - pinky promise. ;)
Thursdays are always fun days at Yumi and Fumi Handmade blog, because DT members share their tips, tutorials etc. with you. And today is my turn. I was scratching my head, thinking hard what to make and at the end I decided to make a door hanger tutorial. I hope you will like it!
For starters let's check what you will need ...
So, as you can see you will need piece of white cardstock and some design papers of your choice, scalloped circle and circle dies, stamp (I used Yumi from Yumi and Fumi Handmade) and some embellishments.
First thing you will need to do is to cut your papers. I used a 10 x 20 cm white cardstock as a base then I cut each layer 5 cm smaller. I also distressed the edges with my scissors and TH distress ink, but that's optional. You should end up with something like this.
Then glue the papers together. You can use the "normal" glue, but I prefer to use sticky tape.
Once you've done this, take your scalloped circle die to cut a scalloped circle from a piece of paper and glue it on top (in the middle) of your door hanger base.
Now place your door hanger base on your cutting machine and put the circle die on the scalloped circle. Like this ...
And here's what you will end up with ...
Voila, your door hanger base is complete. Now you just need to decorate it however you want. :) Here's what mine turned out ...
I used TH distress inks for coloring Yumi and I decorated the door hanger with some pearls, flowers and lace from my stash. I also used a Cart-us border die and Couture creations Super powder puff embossing folder. I wrote the sentiment by hand.
I hope you liked this tutorial and my door hanger. If you have any questions feel free to ask!
I would like to enter my door hanger to the following challenges:
Craft-room: Something new (new embossing folder)
Crafty creations: Shabby chic
Paper crafting journey: Anything goes
Allsorts: Use your new stash (new embossing folder)
Through the craftroom door: Anything goes
Craft-room: Something new (new embossing folder)
Crafty creations: Shabby chic
Paper crafting journey: Anything goes
Allsorts: Use your new stash (new embossing folder)
Through the craftroom door: Anything goes
Also, don't forget to enter our photo inspiration challenge. We'd love to see your creations! :)
Enjoy your day!
Hugs! xx


Gorgeous I will have to try this, xxx
ReplyDeleteGreat tutorial and lovely finished project Cebelica.
ReplyDeleteThanks so much sharing your new crafty stash with us at Allsorts challenge this week.
B x
Brilliant and thank you for sharing this Cebelica its really lovely x
ReplyDeletelove this cebelica.fabulous distressing and colours and the image is so sweet :D
ReplyDeletegood luck with the moving in hun :D
xx coops xx
Great Tutorial, and I love your end creation, lovely girly door hanger, thanks for sharing with us at Craft Room Challenge, Debi x
ReplyDeleteThis is fabulous!! Thanks for joining us at PCJ! HUgsxx
ReplyDeleteOH EM GEE!! This is awesome!! I think I know what I'm making my co-workers for Christmas!! This is a terrific idea! Great tutorial and inspiration!!
ReplyDelete^.^